363
363
Audience: Client Intake Coordinator
Introduction
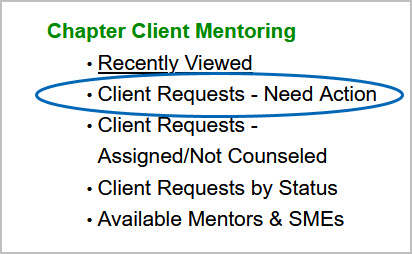
When a client submits a mentoring request, you'll receive an email notification, and the request is automatically sent to the Client Intake Queue. To view the request, click the link in the email or navigate to the Client Intake Queue by clicking the "Client Requests – Need Action" list view found in the homepage. Regularly check the client intake queue to ensure requests progress and follow up with mentors if a request becomes stagnant. This article focuses on viewing mentoring requests in Engage, assigning and reassigning requests to a mentor, and monitoring the progress of assigned requests.
View the full list of notifications for the Client Mentoring Journey here. Ensure you are signed in to your @scorevolunteer.org account to view the document.
Table of Contents:
- Assignment Status Information
- Assigning/Reassigning the Request to a Mentor
- Search Filters Information
- Notes and Limitations
- WalkMe Elements
- Relevant Resources
Assignment Status Information
| Unassigned | This status means that the mentoring request case has not been assigned to a mentor. |
| Assigned-Pending | The mentoring request case has been assigned to a mentor, but the mentor has not accepted/declined the request. |
| Assigned | The mentor has accepted the mentoring request case. |
| Pending Reassignment | The mentor did not accept the assignment within the 5-business day window or they requested that the mentoring case be reassigned. |
How to Assign/Reassign a Mentoring Request
1) Select "Client Requests - Need Action" from the homepage. When reassigning, select "Client Requests by Status."
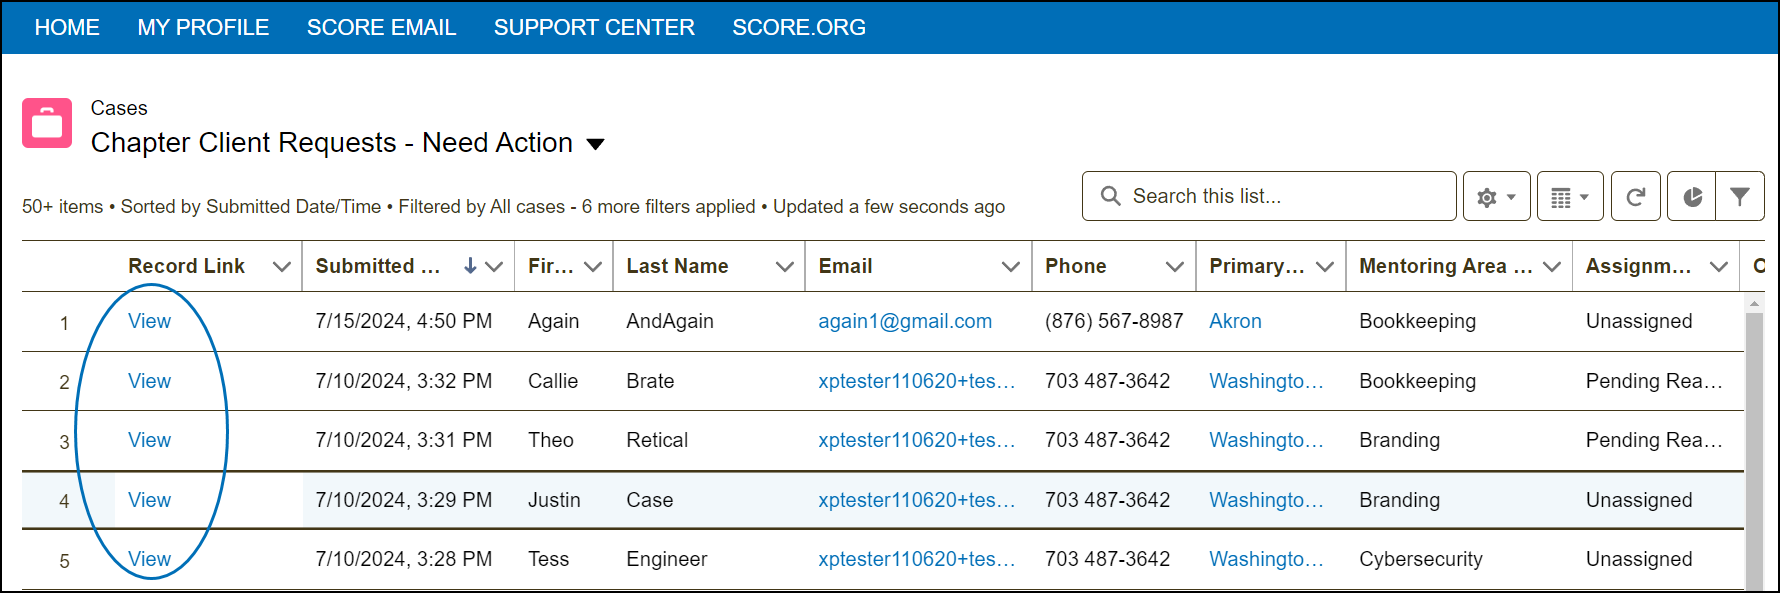
2) Find the mentoring request in the queue and click "View" to see the details of the mentoring request case.
3) Click the "Assign/Reassign" button in the mentoring request case.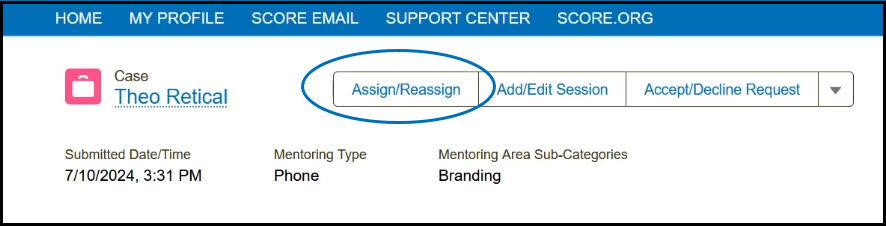
4) The "Assign/Reassign" window provides search instructions and is set to search within your chapter by default. The results table will automatically display mentors who match the "Mentoring Area" and/or "Type of Business" for easy selection. If you'd prefer to search manually, simply click "Reset" to clear the filters and use your own criteria.
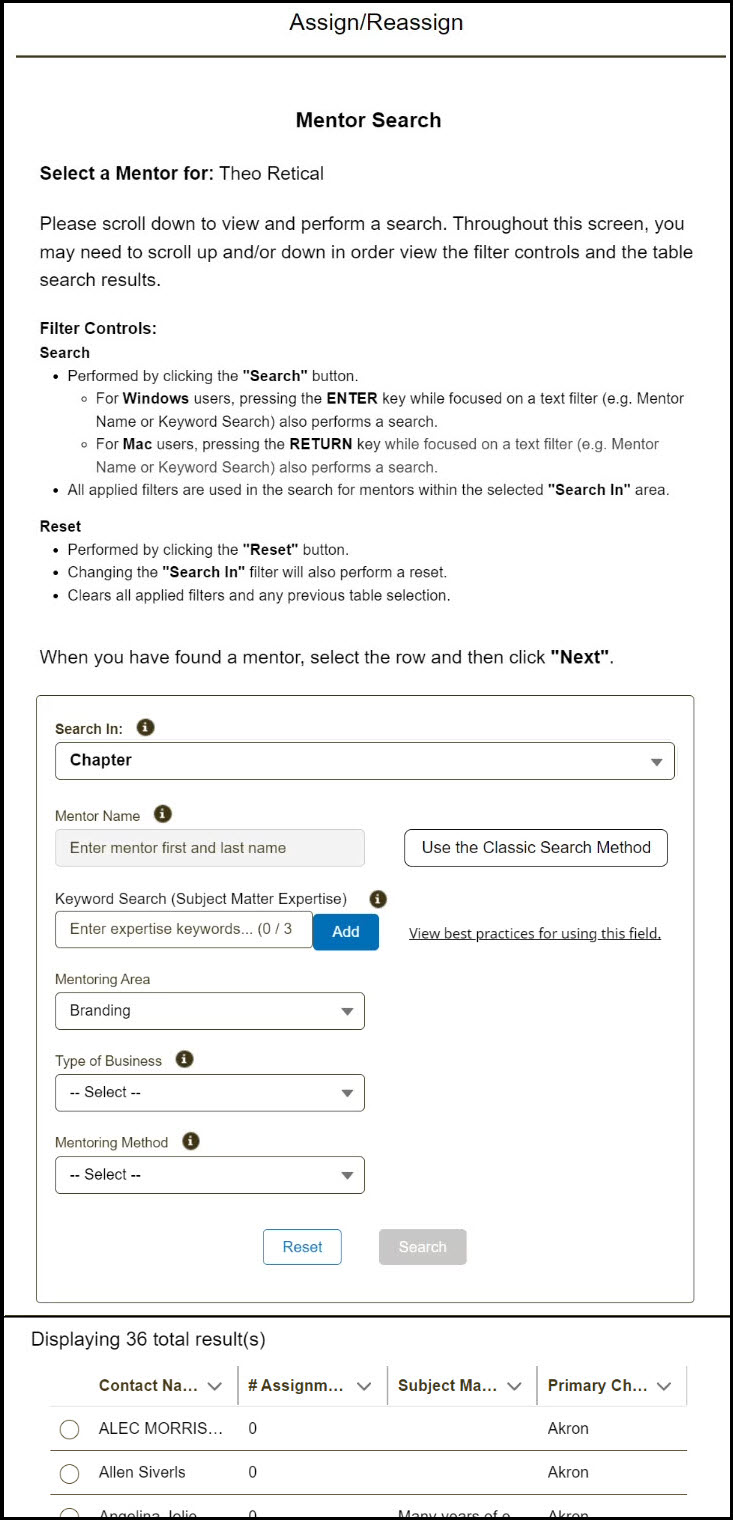
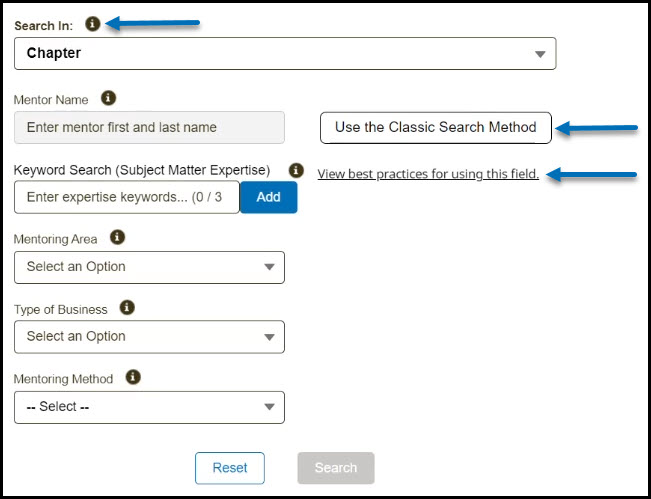
Search Filters Information
Search In: This field is set to search within your Chapter by default. Click the field to select other options, such as District, Region, or other chapters. Selecting a new option in this field will also automatically reset all other filters below.
Mentor Name: When you first open the Assign/Reassign flow, this field will appear grayed out due to the pre-filled filters, such as Mentoring Area. To activate it, click the Reset button. Alternatively, you can use the Classic Search Method button.
Keyword Search: Refer to Best Practices for Using the Keyword Search Feature guide. Note that this field corresponds to the Subject Matter Expertise field in a mentor's profile, and for optimal results, there is a limit of 3 keyword searches.
Mentoring Area: This field is pre-filled based on the details provided by the client in the mentoring request. It matches the client’s request to mentors with corresponding Areas of Expertise in their profiles.
Type of Business: If the client provides information in the mentoring request, this field will be pre-filled and will map results to mentors with matching Industry Experience in their profiles.
Mentoring Method - This field is never pre-filled and defaults to -Select-. However, it’s available for CICs to filter search results by mentoring methods if needed.
Reset button: Clicking this button clears all fields and resets the search filters.
Search button: This button becomes active once a valid search value is entered or selected. As a best practice, clicking the reset button to clear all values will also activate this button for a fresh search.
Use the Classic Search Method button: This WalkMe guidance tool allows you to reset and search within the chapter.
View best practice for using this field link - This is another WalkMe guidance tool added to shuttle you to the best practice guide.
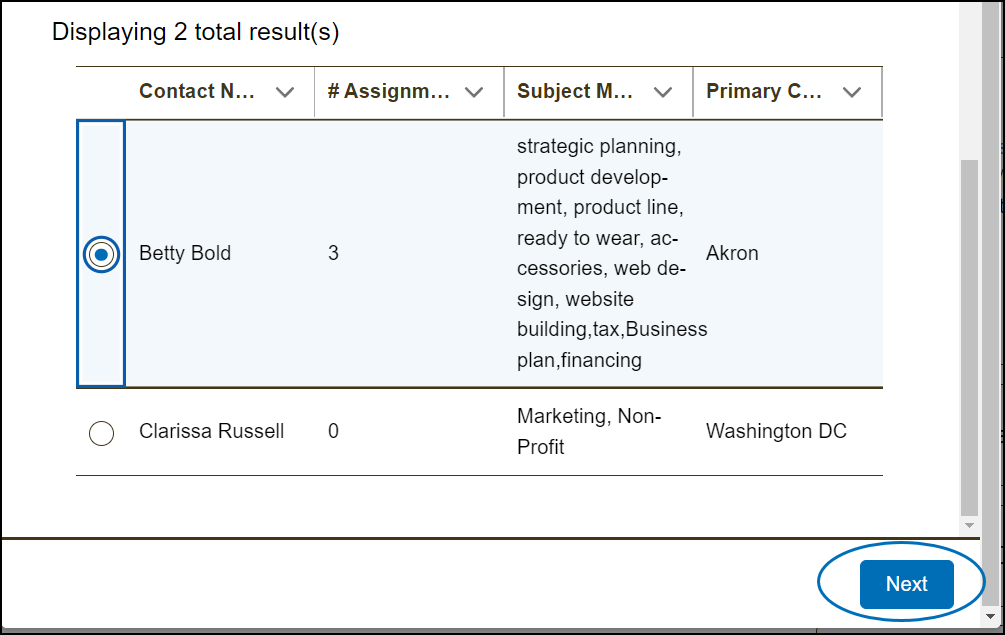
5) Select a mentor from the results by clicking the radio button next to their name. You can only select one mentor per assignment. Then, click "Next."
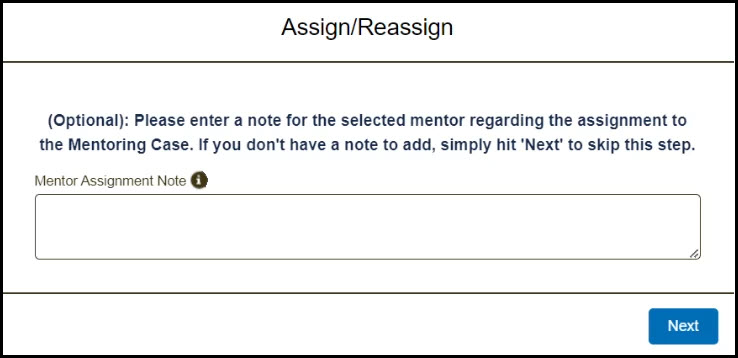
6) In the next window, you have the option to enter a note about the assignment for the selected mentor. Please do not exit from the assignment note screen. Even if you choose not to leave a note, ensure you proceed to the next page to continue the process. So, click "Next" from here to proceed.
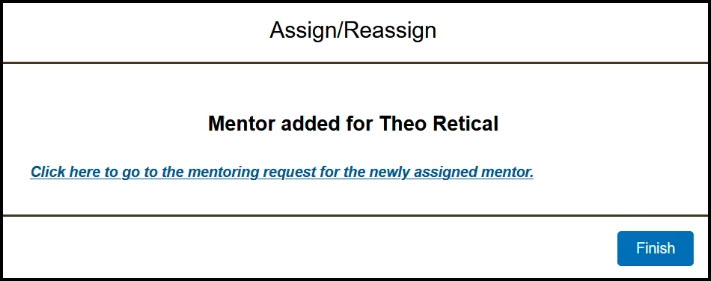
7) Click "Finish" on the last screen. Engage will email the mentor with a notification about this assignment.
Notes and Limitations:
- If the current mentor cannot accept the request within 5 business days, use the Assign/Reassign process to ensure timely support for the client.
- As a CIC, you can reassign a mentoring request to any mentor, regardless of the Assignment Status. This provides flexibility in matching clients with the most suitable mentors.
- When reassigning, a notification email is sent to the new mentor, but the previous mentor is not notified. Ensure both mentors are aware of the change to avoid confusion.
- When you add an assignment note, it will be included in the notification email sent to the assigned mentor and stored in the Notes related list.
-
It's important not to exit from the assignment note screen, even if you decide not to leave a note. Clicking the Next button is crucial because it ensures that the rest of the process continues smoothly, including the creation of the assignment and the sending of the email. The system needs to know whether or not you're including a note, and exiting at this stage disrupts that flow.
WalkMe Integration
We have added WalkMe elements in Engage to help you navigate and understand the updated assign/reassign flow. You'll find helpful guidance in the WalkMe Menu, a link on the list view for Client Requests and elements added in the assign/reassign window, which offer support for a smooth and efficient experience with the updated process.
In the assignment window, you'll find the following helpful elements:
- Infotext: Hover your mouse on the i icon next to the label to see informational text about the field.
- Use the Classic Search Method button: This button automatically resets and performs a search, just as you did in the previous flow.
- View best practice for using this field: Use this to open a new window to view a guide on how best to use the Keyword Search field.
On the list view for Chapter Client Requests - Need Action and Chapter Requests by Status (Active), a link to a tour of the Assign/Reassign Flow is also visible.

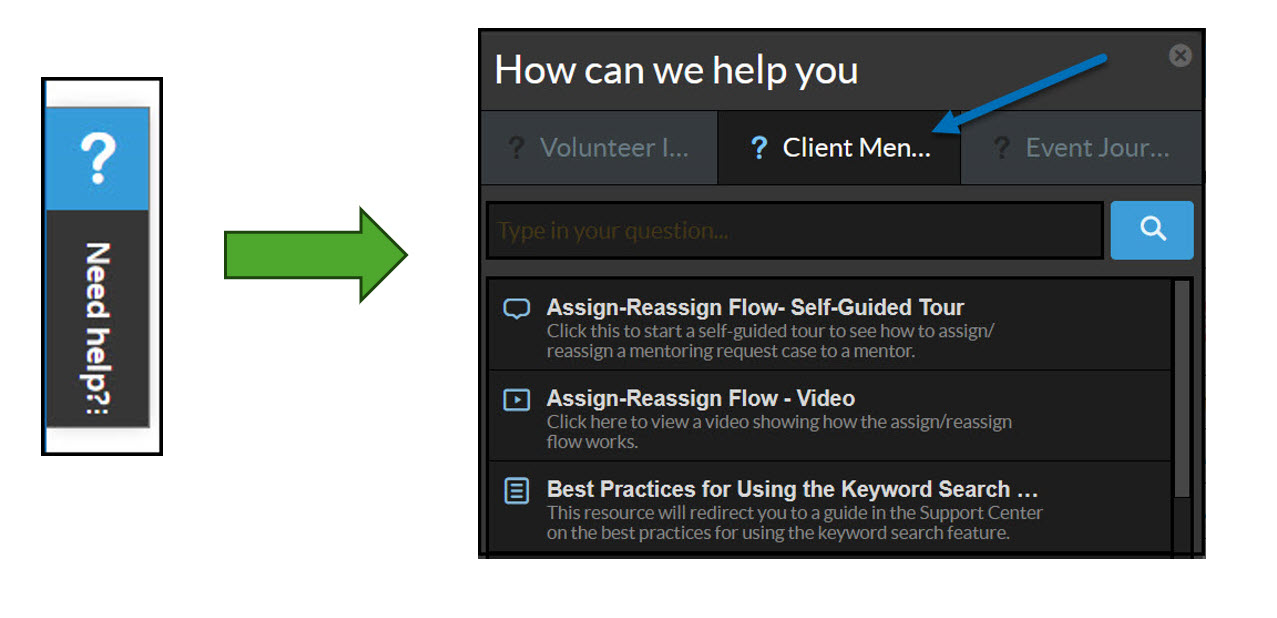
Clicking the Need Help on the left-hand corner of the Engage screen will open to a WalkMe Menu; select the Client Mentoring Journey tab to access the following resources:
- Assign-Reassign Flow Self Guided Tour
- Assign-Reassign Flow Video
- Best Practices for using the Keyword Search field guide