
 0
0
Chapter Website Configuration
2.1 Creating a Chapter
Chapters are created as Drupal nodes via synchronization of basic data from either the CORE database or Engage to the Drupal database. When a new Chapter has been created for SCORE, the Chapter details are entered into CORE or Engage and will be imported into Drupal during the next database update, which runs every 30 minutes for CORE and every 15 minutes for Engage. Note that all chapters will be migrated to Engage from CORE, which will be retired once all migrations are completed.
Once a chapter has been created and is ready for you to begin preparations SCORE will notify you.
2.2 Editing a Chapter
When your site has been prepared and you have been notified on how to log in you can begin the process of preparing your site. When logged into your site and you have navigated to your Chapter Landing Page you will see an additional group of tabs below the main menu links. By clicking on the ‘Edit’ tab you will be able to start setting up your Hero Block, home page Content Bands, and Chapter Configuration.

Figure 2‑1 - Editing tabs
2.2.1 The Chapter Homepage
DO NOT click on the “Site is Live” checkbox. This checkbox will start the publishing process to make your chapter live to the public. More steps must be completed by the technology team to finish the process.
If this box is already checked (applies to most chapters): DO NOT uncheck the box as this will reset the publishing process for your chapter and make your site unavailable to end-users.

Figure 2‑2 - Site is Live checkbox
2.2.1.1 Hero Block Tab
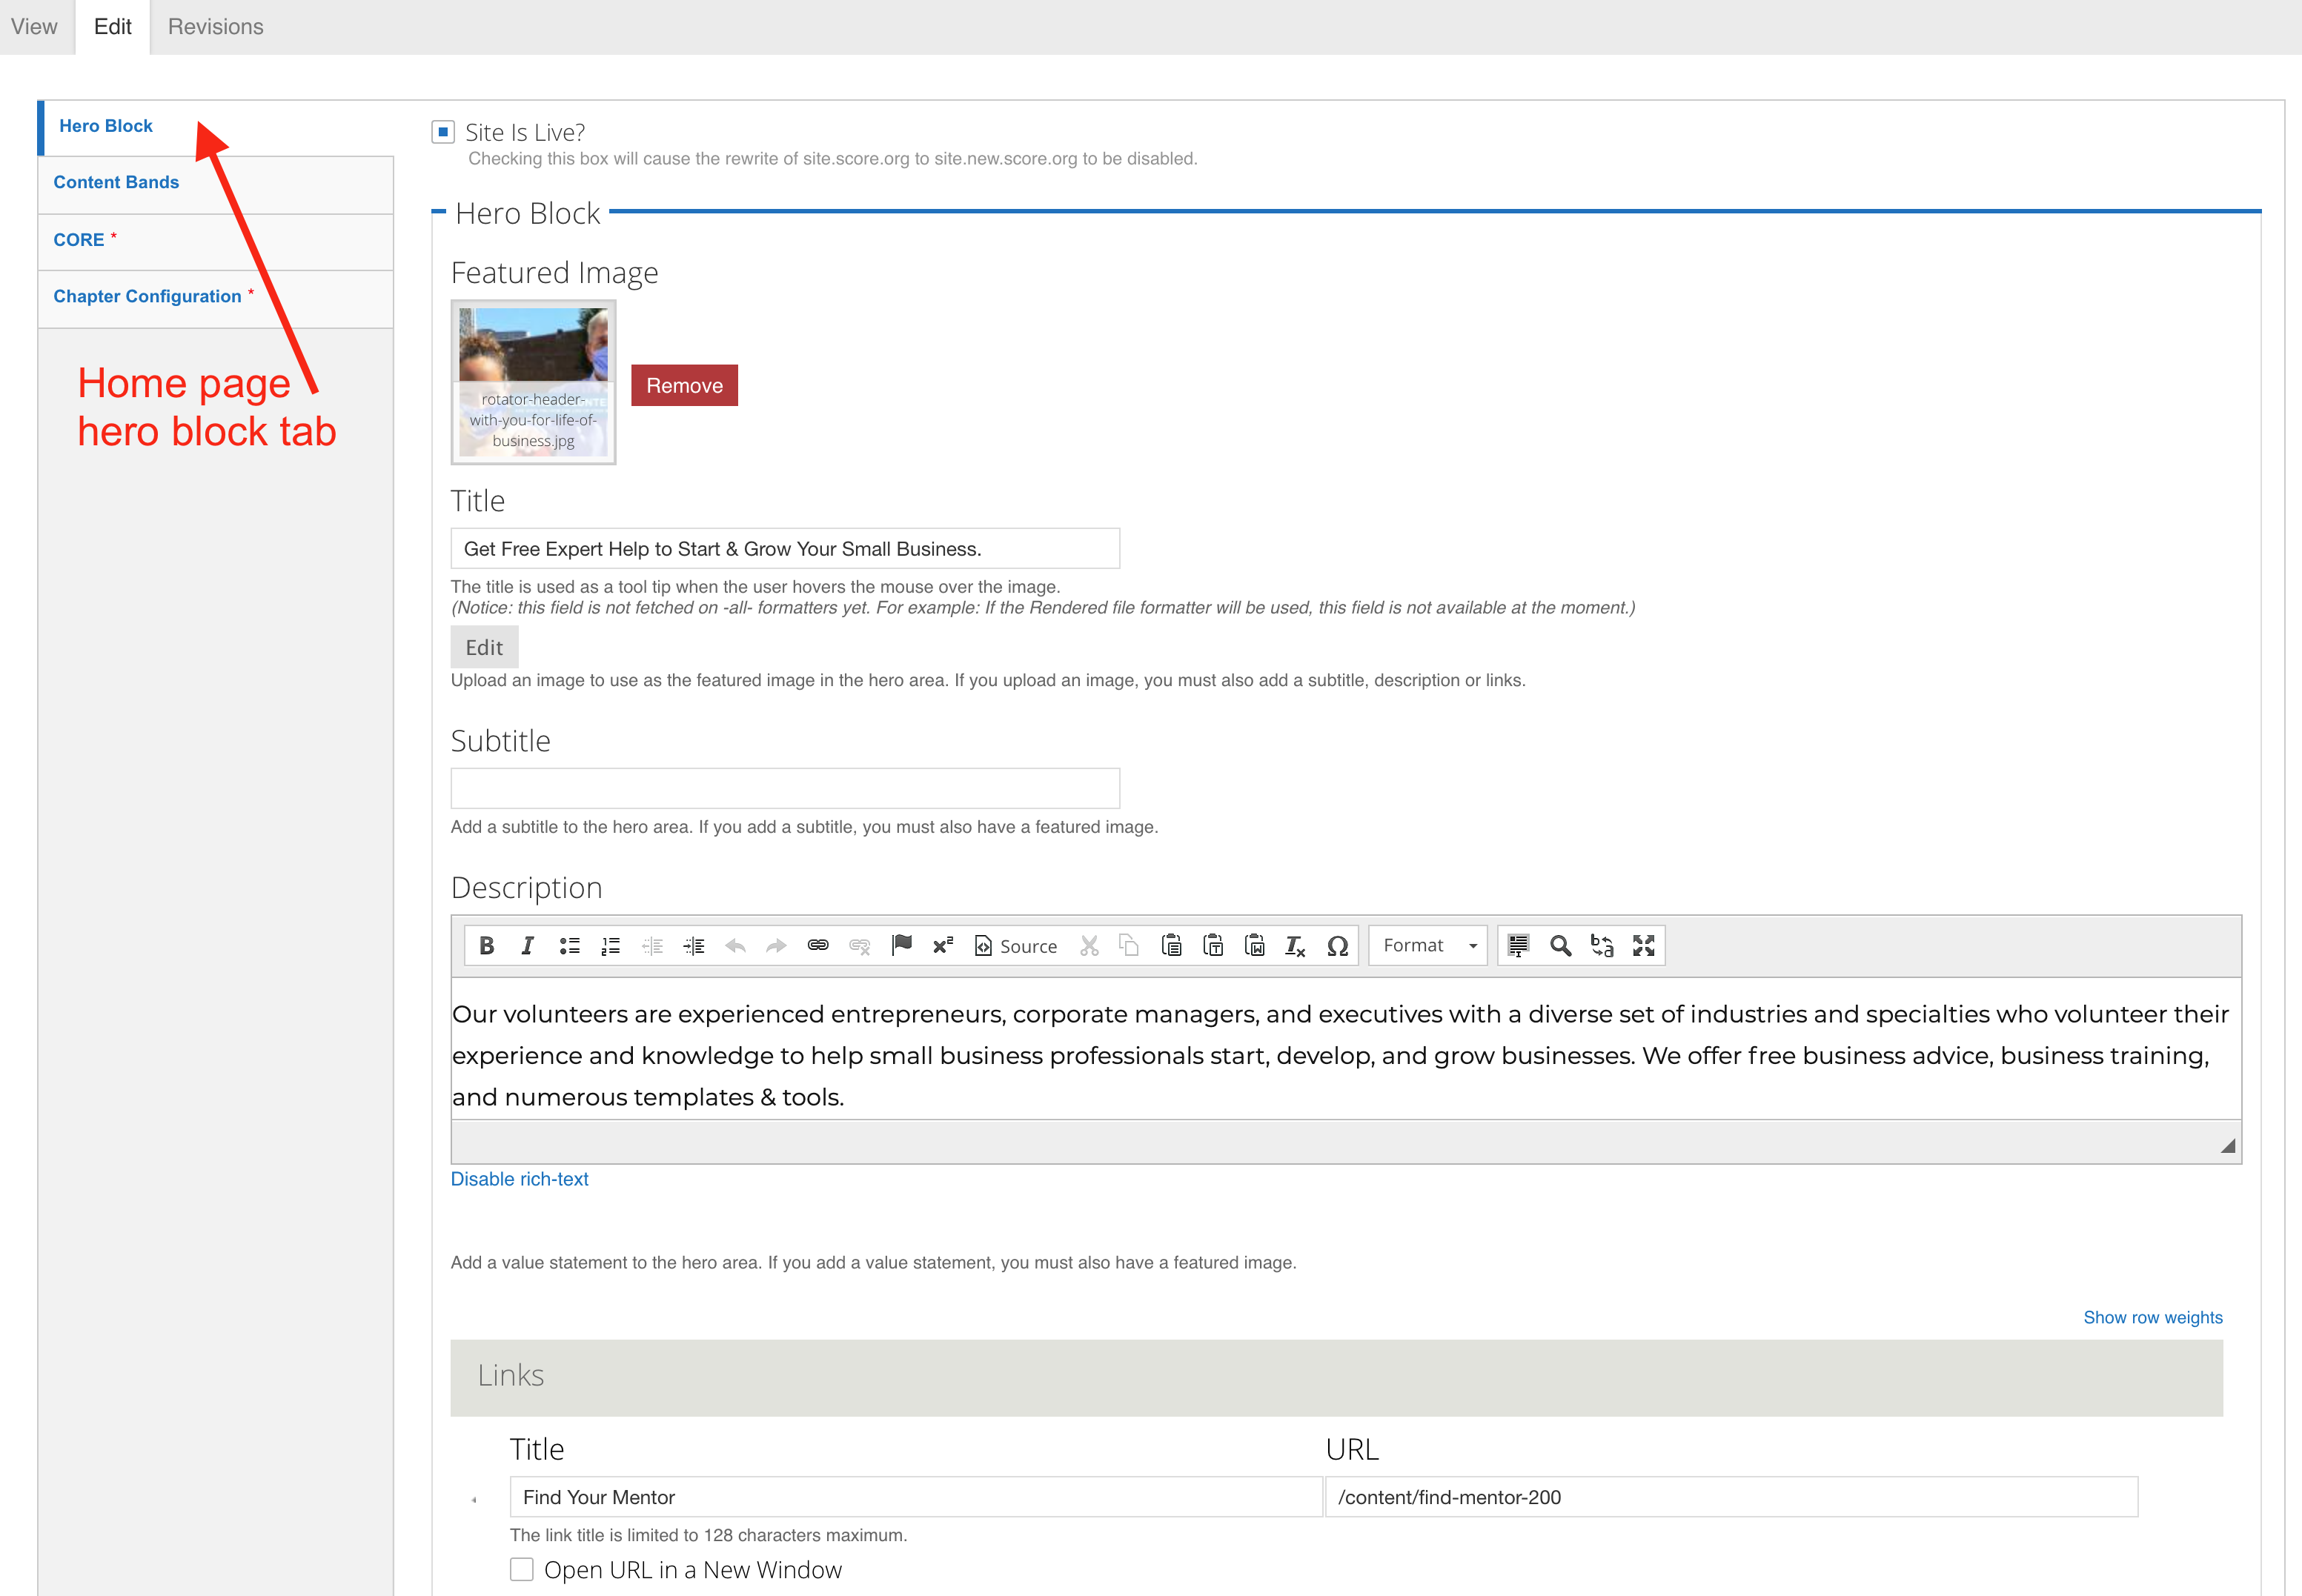
Figure 2‑3 - Hero Block overview
The Hero Block is the image and description that appears at the top of the page. It is a prominently displayed section with a visually striking image and texts supported via the WYSIWYG editor. The Hero Block is optional and if left blank, it will not appear on your homepage.
Featured Image: This is a file upload space for the Hero Image. Click on the 'Browse' button to open the Media Browser to upload or find an image in the library. See Image Upload and Guidelines.
- Allowed file types: png, gif, jpg, or jpeg.
- Files must be less than 50 MB.
- These are meant to be “fluid images” that scale and grow with the page. They are not associated with the aspect ratios used for other images on the site.
Title: (Optional) It displays as a tooltip when the Hero Block image hovers over. It can be used to provide additional context which may help people with disabilities, but should not repeat what is used in the image ALT text field.
Subtitle: (Optional) The subtitle displays in the text area that accompanies the Hero Block image.
Description: This appears beneath the optional subtitle. There is a WYSIWYG editor to enter text to supplement the featured image. See Hero WYSIWYG Section.
Links: (Optional) “Call to Action” button to be placed at the bottom of the Hero Block.
Title: In the “Title” field, enter the text to display on the Call to Action button.
URL: In the “URL” field, enter the relative path to your page; e.g. “contact-us”. DO NOT type the full URL in the field if it is an INTERNAL link. If you wish to link to an external page, then enter the full URL, such as http://www.example.com.
Open in a New Window: (Optional) Select the checkbox to allow the link to open in a new window rather than replace the current page the visitor is viewing. Used for External Links. See Linking content section.
Add Another Item: Click this button if you want to add more links. The page will refresh to display another “Title” field, “URL” field and “Open in a new window” checkbox, if these fields are left blank they will not display.
Background Color: The default background color behind the Subtitle + Description is grey. If desired, change the background to green by selecting the drop-down to “green.”
2.2.1.2 Content Bands Tab
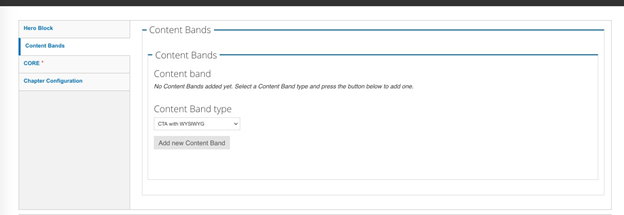
Figure 2‑4 - Content Bands tabs
Chapter homepages are landing pages built using content bands. Please select the desired content bands from the drop-down menu. Follow the directions in the “Add a Content Band” section for details.
2.2.1.3 CORE Tab
The CORE section of the Chapter data is non-editable in Drupal and may only be updated in CORE or Engage. This includes the “details” about a Chapter, such as its name, webmaster, chapter email address, chapter ID, and location. This section is available on the website to show you what information is being pulled from CORE or Engage. Log in to CORE or Engage to make changes to this information.
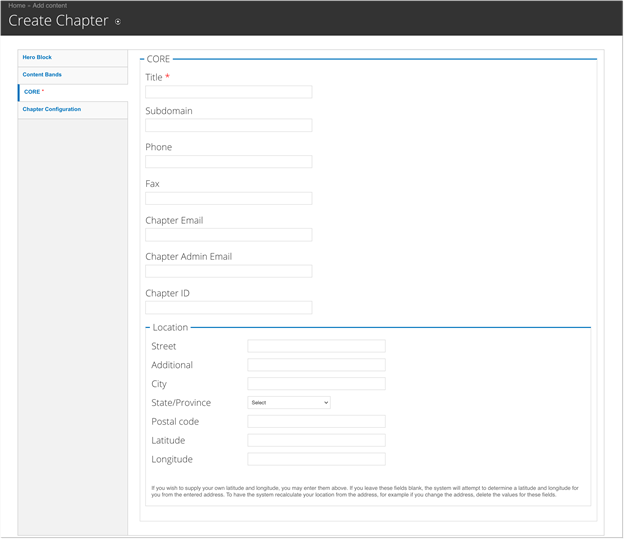
Figure 2‑5 - Create Chapter core tab
2.2.1.4 Chapter Configuration
This is where you’ll make changes to the menus, header, and footer of your chapter website. The required links and fields in this section have default values that will appear on all chapter sites. If these fields are not given values by the local chapter they receive default values that automatically populate from the national organization. To customize these required fields, and several optional fields, entries have been made possible in the Chapter Configuration section. If the local chapter utilizes these fields the local information provided will appear on the chapter’s site and the links and information will be what the chapter specifies. If the local chapter does not update the required fields the default national values will be shown on the site. The default values have been crafted to be sufficient to allow the local chapter to leave the default in place while giving a consistent look and feel to the site.
Summary: The summary text field is required on all content types. The summary appears in the content list on landing pages and search results. The summary is also used as the page meta description (unless changed in page settings) and will be used by search engines such as Google in search results. Best practices: Summarize the page content in 160 words or less. Be sure to capture the main topic and/or theme of the page and include concise keywords and phrases.
Body: WYSIWYG Text Area. This field does NOT currently display anywhere on the site. It is a default field that is maintained for future applications.
Areas Served: Header text for “Areas Served” to appear next to Chapter Name. There is a 100- character limit.


Figure 2‑6 - Areas served
Contact Us Link: Use this field to update the text and link for the contact us messaging in the footer. As with most fields discussed in this section, a default value is provided and may be left in place, but each chapter can overwrite this with its own text and links.
- Title: The full text of the Contact Us Link as displayed in the footer. There is a 128 character limit on the title.
- URL: The destination for the Contact Us link.


Figure 2‑7 - Contact Us link
- Constant Contact Sign-Up URL: Add the subscription link to your chapter’s Constant Contact newsletter in this field to have new subscribers added to your email list. Since this area connects to Constant Contact and does not connect to a node within the site it is required that the full URL be utilized.
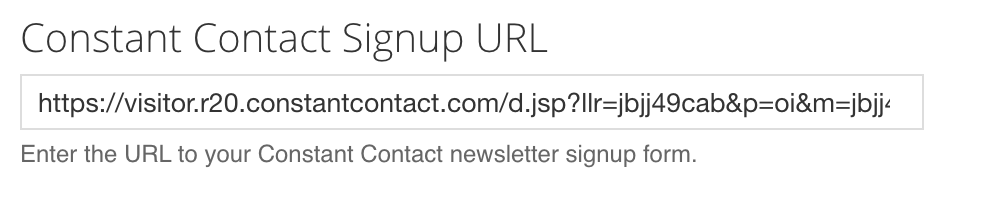
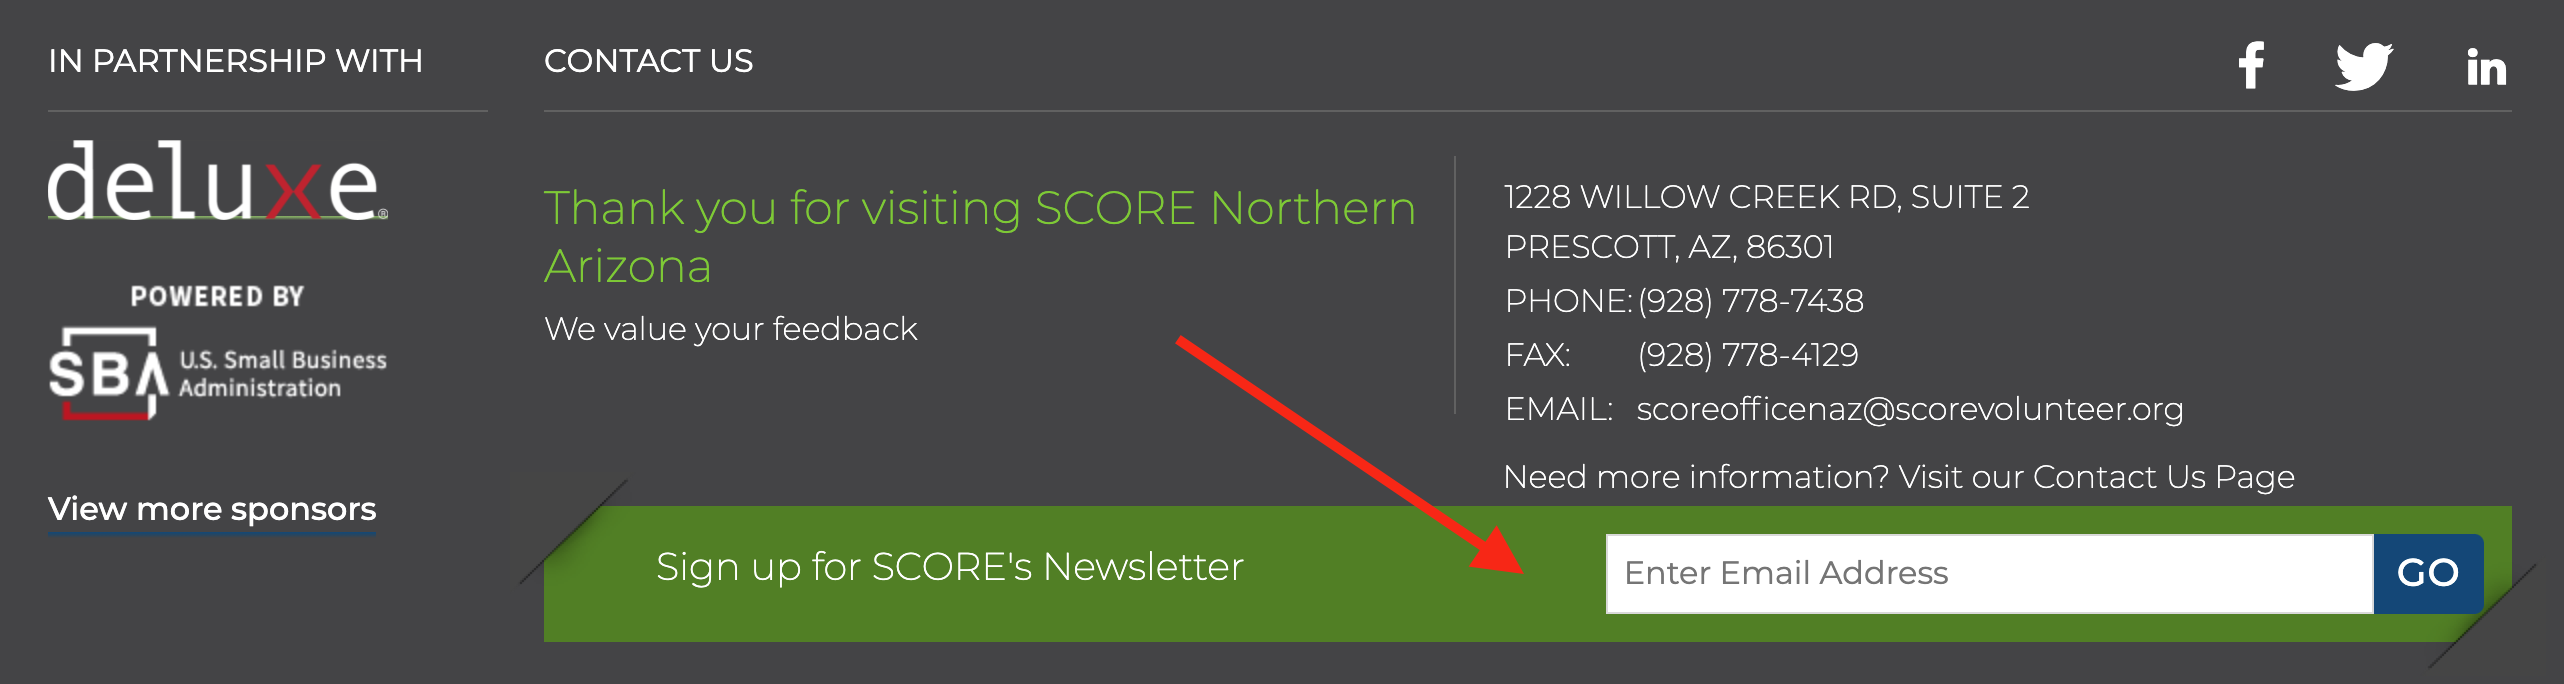
Figure 2‑8 - Constant Contact link
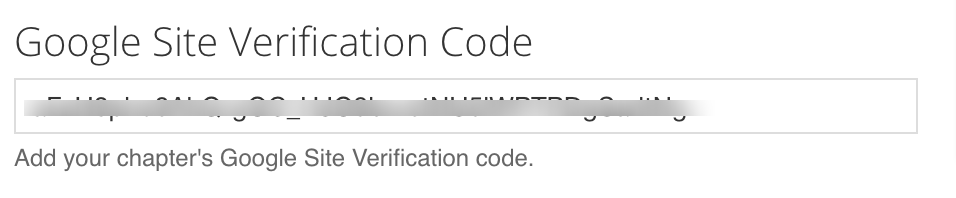
Google Site Verification Code: (Optional) The Google Site Verification Code is an alphanumerical code to place in this section.
Google may need to verify your website ownership and control for several reasons across its product offerings. Website verification shows Google that you have administrative control of your website by having you prove that you can place a hidden tag on your home page. Note that other methods are available but our focus will be on the meta tag insertion method. The Google Site Verification field in the Chapter Configuration section facilitates this process. Some examples of Google products that require verification are use of Google Search Console, Google Analytics, Google Tag Manager, Google Workspaces, and Google Ads. (Note that access to Google Analytics is already configured and can be shared with you by HQ. Simply email [email protected] and be sure to send an email address attached to a valid Google account to be granted access.) Most of these Google products are unnecessary for chapter needs. The most common Google product chapters use where this verification is necessary will be Google Ads. You can find specific information on verifying your site through Google Ads here. The following screenshots show the process of verification through Google Search Console, a helpful SEO tool, that may help guide the process of obtaining the verification code. Note that all of the methods will contain the actual code that is needed to populate the Verification field on the website, the code is a long random string of letters, numbers and symbols that can be copy/pasted to the field.
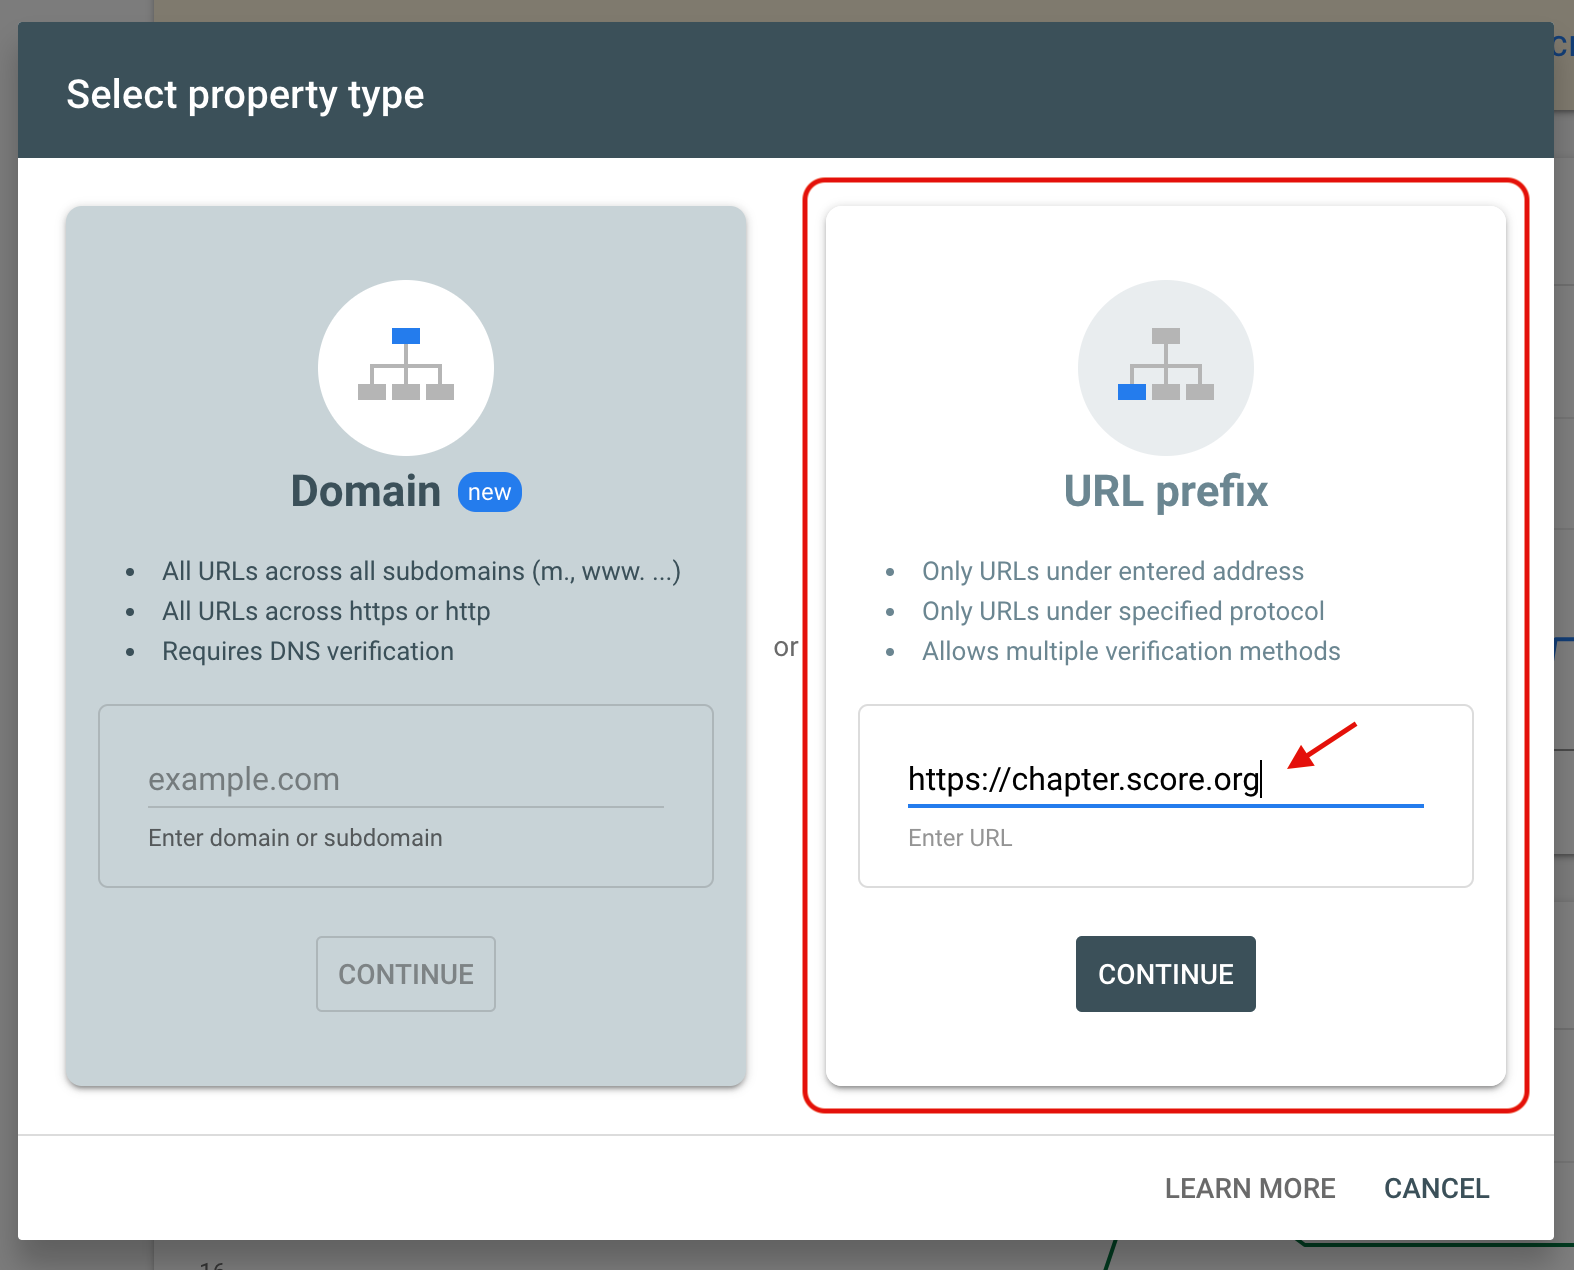
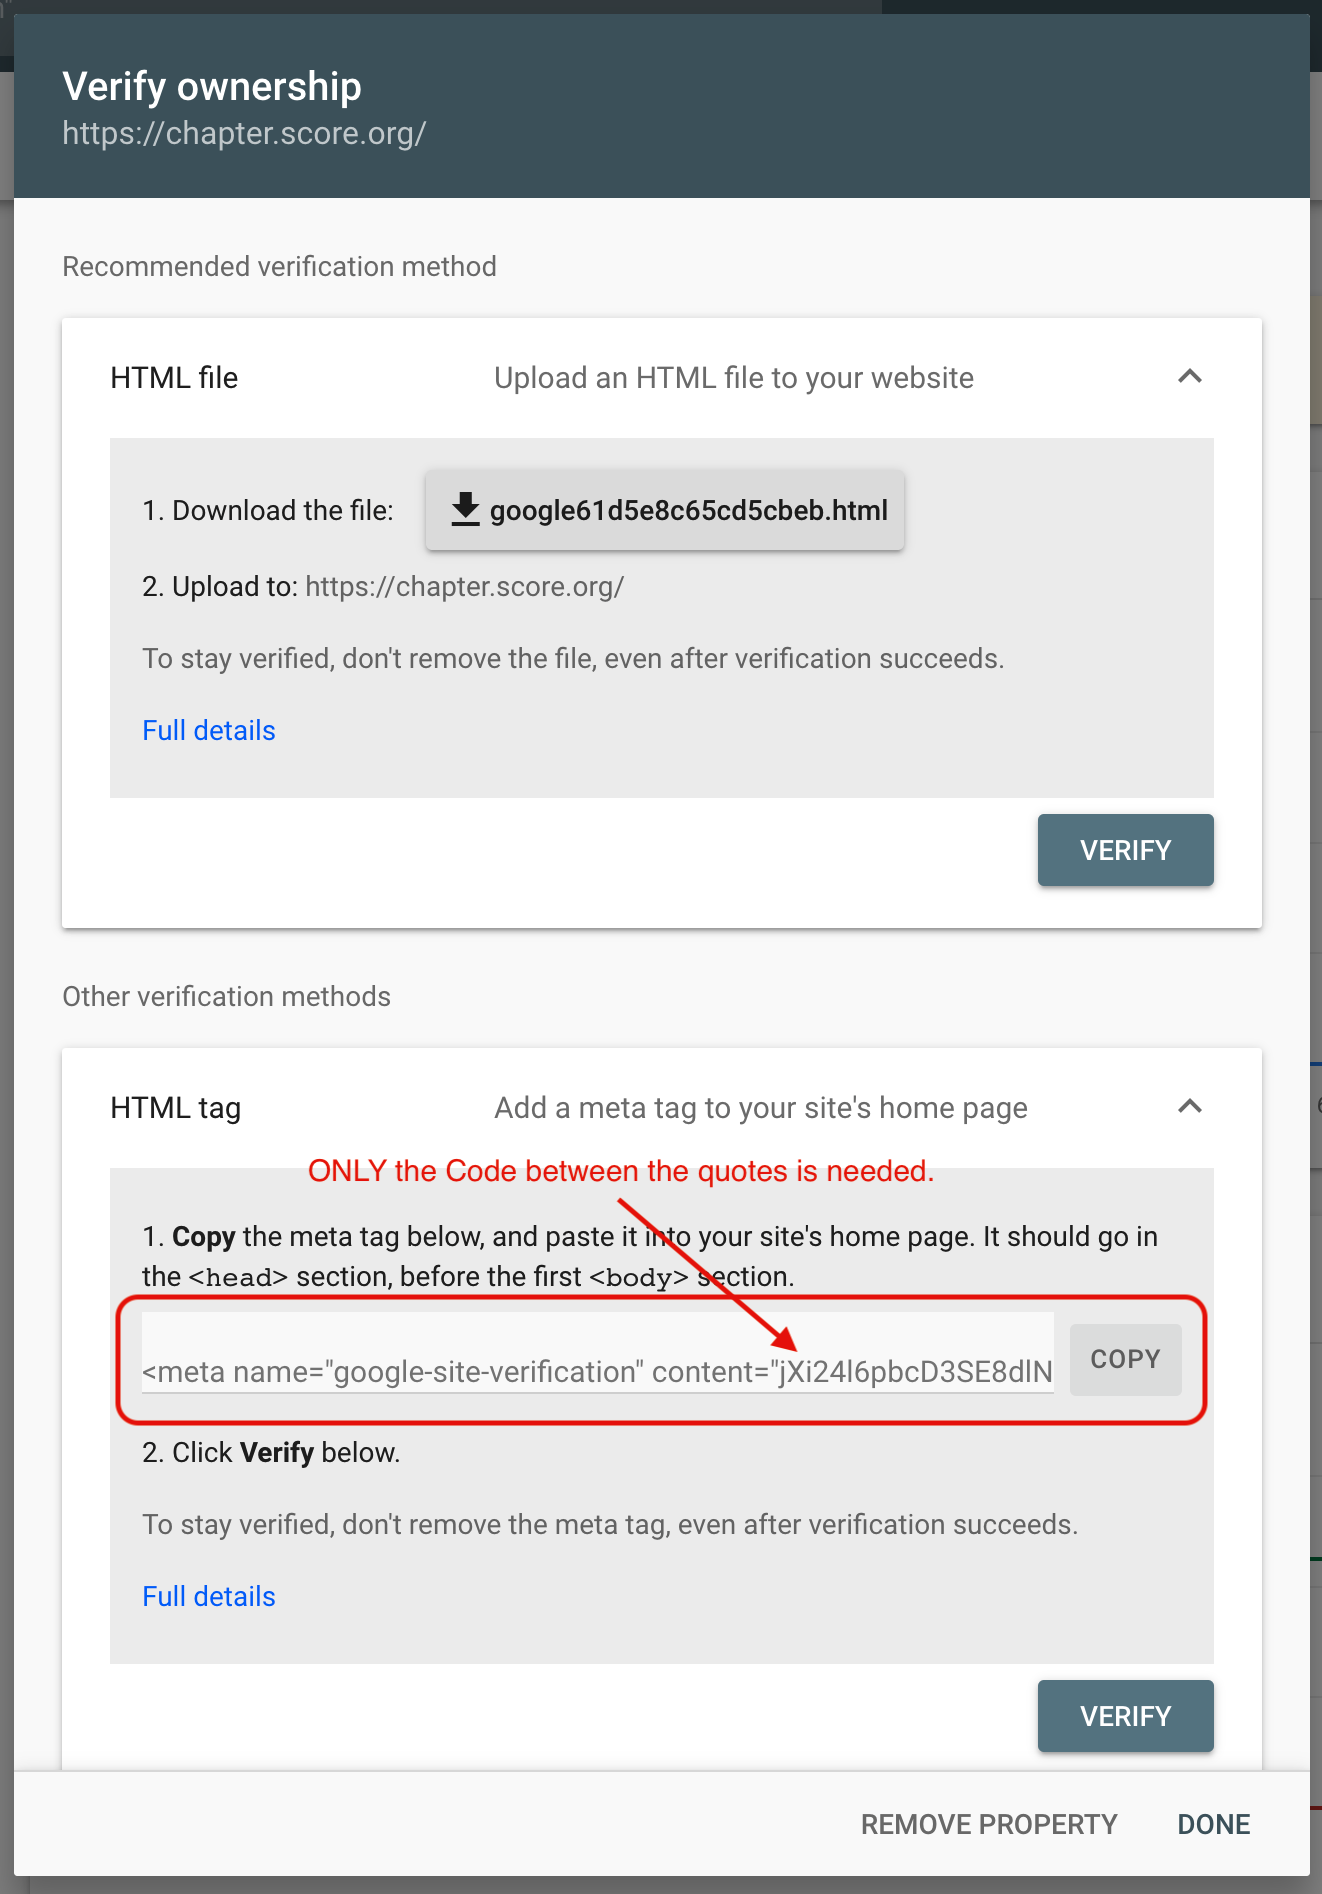
Figures 2‑9 - Google Site Verification Code
Updating the Header: The chapter menu items are controlled via the main navigation and utility navigation fields in the chapter configuration tab. The main navigation links will be displayed on all pages, secondary sub-menu links will only be displayed when the associated main navigation link page is selected.
- Main Navigation
- Secondary Link: (Optional) A third menu item can be added to the secondary menu.
- Title: The Menu label that appears for site visitors.
- URL: The page you want to link to. Enter the relative path to your page; e.g. “contact-us”.
- Secondary Link: (Optional) A third menu item can be added to the secondary menu.

Figure 2‑10 - Secondary Link configuration
- Secondary Sub-menu Links: You can add up to 6 links to appear in the submenu of the secondary menu link that you create for your chapter.
- Title: The Menu label that appears for site visitors.
- URL: The page you want to link to. Enter the relative path to your page; e.g. “contact-us”.
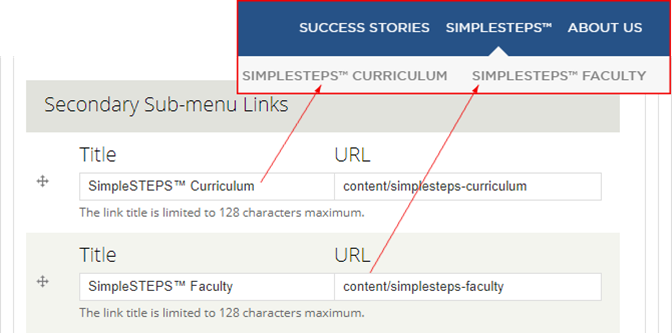
Figure 2‑11 - Secondary link sub-menu links
- Success Story: Your chapter can create your own success stories page and link to it from the menu. If no link is entered it will default to the “Success Story” link from the National Site.
- Title: The Menu label that appears for site visitors. This can be used to change the label “Success Stories”
- URL: If you wish to link to a different page from the Chapter site, enter the relative path to your page; e.g. “ohio-success-stories”.
- Success Stories Sub-menu Links: You can add up to 6 links to appear in the submenu of the success stories link that you create for your chapter.
- Title: The Menu label that appears for site visitors.
- URL: The page you want to link to. Enter the relative path to your page; e.g. “ohio-testimonials”.
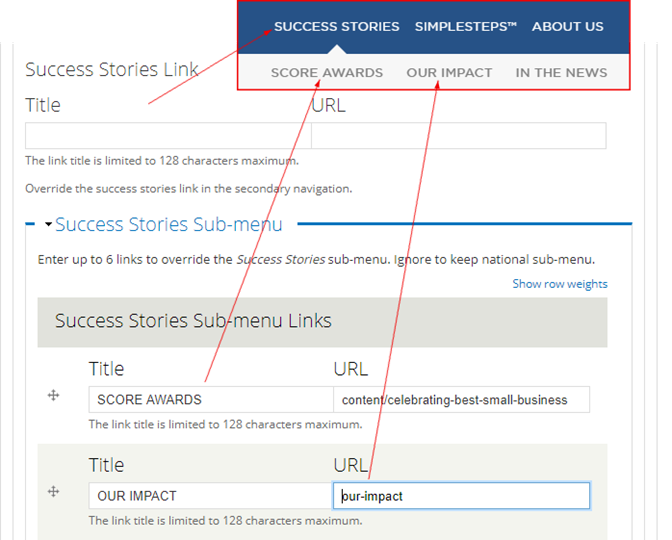
Figure 2‑12 - Success Story links
- About Us: Your chapter can create your own about us page and link to it from the menu. If no link is entered it will default to the “About Us” page from the National Site. Chapters have the option to create and link to their own about us page in this menu.
- Title: The Menu label that appears for site visitors. This can be used to change the label “About Us”
- URL: If you wish to link to a different page from the Chapter site, enter the relative path to your page; e.g. “about-ohio-score”.
- About Us Sub-menu Links: You can add up to 6 links to appear in the submenu of the success stories link that you create for your chapter.
- Title: The Menu label that appears for site visitors.
- URL: The page you want to link to. Enter the relative path to your page; e.g. “ohio-score-locations”.
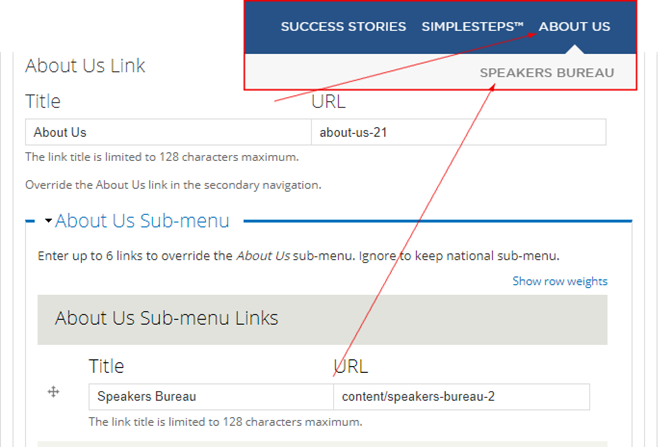
Figure 2‑13 - About Us links
- Utility Navigation
- Volunteer Link: Your chapter can create your own volunteer page and link to it from the menu. If no link is entered it will default to the “Volunteer” link from the National Site. If you wish to link to a different page from the Chapter site, enter the relative path to your page; e.g. “volunteer-now”. See Linking content Section
- Donate Link: Your chapter can create your own donate page and link to it from the menu. If no link is entered it will default to the “Donate” link from the National Site. If you wish to link to a different page from the chapter site, enter the relative path to your page; e.g. “donate-now”. See Linking content Section
- Utility Links: These are optional fields allowing chapters to add additional links to the utility navigation for their site.
- Title: The Menu label that appears for site visitors.
- URL: If you wish to link to a different page from the Chapter site, enter the relative path to your page; e.g. “contact-us”. While it is not recommended for usability best practices, if you wish to link to an external page, then enter the full URL, such as http://www.example.com. See Linking content Section
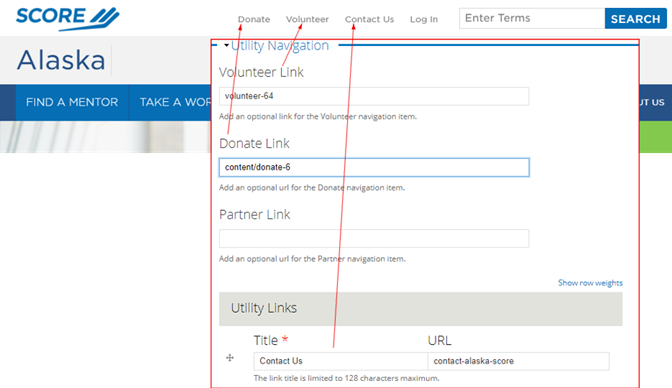
Figure 2‑14 - Utility Links configuration
Updating the Footer
- Footer Email Text: Add the label for the email contact link that you’d like to display in the footer. For example: “Email the Atlanta Chapter” or “[email protected]”
- Footer Email Address: Enter the email address where you would like to receive email inquiries. For example: [email protected]
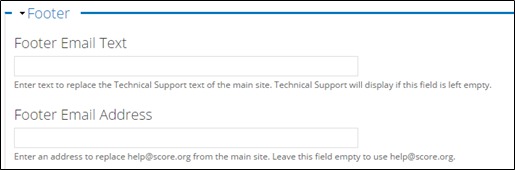
Figure 2‑15 - Footer Email links
- Sponsor Image: Upload the sponsor logo you’d like to display in the top square in the footer.
- Sponsor Link: Add the webpage that you’d like to link to when users click on the sponsor logo.
- Sponsor Image 2: Upload the sponsor logo you’d like to display in the 2nd square in the footer.
- Sponsor Link 2: Add the webpage that you’d like to link to when users click on the sponsor logo.
- All Sponsors Link: Add the URL for the page you’d like users to visit when they click the “View more sponsors link” listed just beneath the sponsor logos in the footer. If no link is added, users will see the National “Our Sponsors” page.
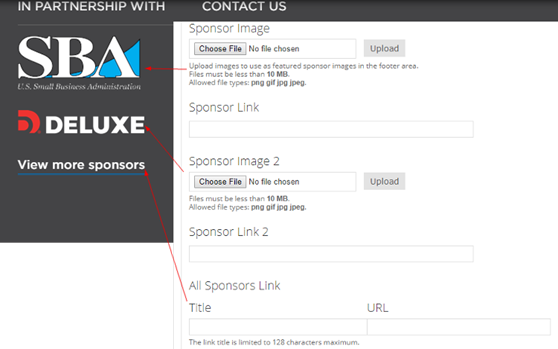
Figure 2‑16 - Sponsor Links configuration
Social Media
- Display Connect Block: Select if you wish to display Chapter Social Media beneath Hero. Only icons from the sites that you specify a URL for will be displayed. The bar will not display links to any source that is left blank. The bar is displayed in two separate locations (directly beneath the Hero Bar near the top and at the top of the page footer) each takes on the background of the area it is displayed in.
- Connect with SCORE: Enter the Text that you want to appear to the left of the Social Media links, which is to the left beneath the Hero. We suggest something like, “Connect with Richmond SCORE”.
- Social Media URLs: Enter the Full URL of the Social Media accounts that you wish to be associated with this SCORE Chapter. E.g., facebook.com/RichmondSCORE.

Figure 2‑17 - Social Media links display
|
o Facebook o Twitter o LinkedIn o iTunes |
o YouTube o Pinterest o Google+ o Instagram |
2.2.2 Syncing Local Events from Constant Contact
The Constant Contact API allows for integration of Local Events into the Drupal CMS. When a Chapter is “connected” with its Constant Contact account, Events created in Constant Contact will automatically get imported into Drupal as Event nodes (workshop pages).
2.2.2.1 Constant Contact Authorization
The staff at the national office must authorize the Constant Contact API for your chapter. Please send your Constant Contact username, password, and the cutoff date for workshops to [email protected]. The cutoff date is the start date from which all events should be migrated. For example, if you set your cutoff date as June 2016, all events created from June 1, 2016 forward will be migrated to the site. Events created before this date will not be imported.
2.2.2.2 Event sync via Constant Contact
Active Events will be imported after the Chapter has been successfully authorized via the Constant Contact API. Your workshops will be updated nightly. If you need a more frequent sync of workshops, email [email protected].
Local Workshop events are created/updated for events that:
- Start after the cutoff date.
- Are in ACTIVE status.
- Has reached the “active date”. (meaning it is published)
Once an event stops being ACTIVE, it is unpublished at the next sync run.
The Events will be created with the following data points:
- The Event Type is set to Local Events.
- The author is set to that of the Chapter Webmaster.
- The following fields are populated:
- Title
- Registration Link
- Short Description
- Start/End Date
- Location Information
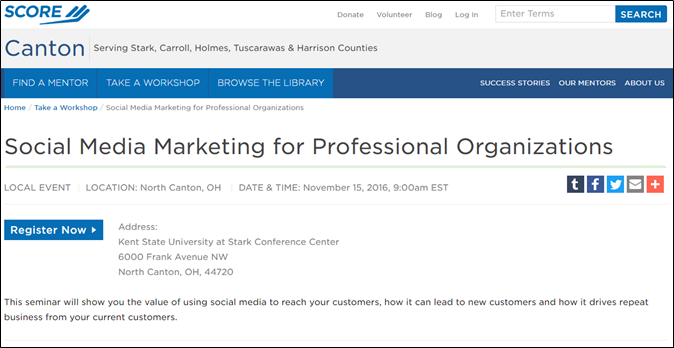
Figure 2‑18 - Constant Contact Event display
The Constant Contact description populates from the Body field if it has been completed. If the body field has not been completed then the required Short Description field from Constant Contact will be used.
2.3 Creating a Branch
Branches, like Chapter nodes, are created via a CORE sync. Whenever a new Branch has been entered in CORE, the new Branch node will be imported into Drupal in the next update, which runs every 30 minutes.
However, unlike the Chapter nodes, the Branch nodes DO NOT APPEAR to site visitors.
2.3.1 Editing a Branch
Branch nodes are not configured to display to Site Visitors. If a chapter wishes to dedicate a page on its site to a Branch, they must create a Basic Page or a Landing Page with relevant Branch Content.
2.3.1.1 Linking a Branch on the “Find a Location Page”
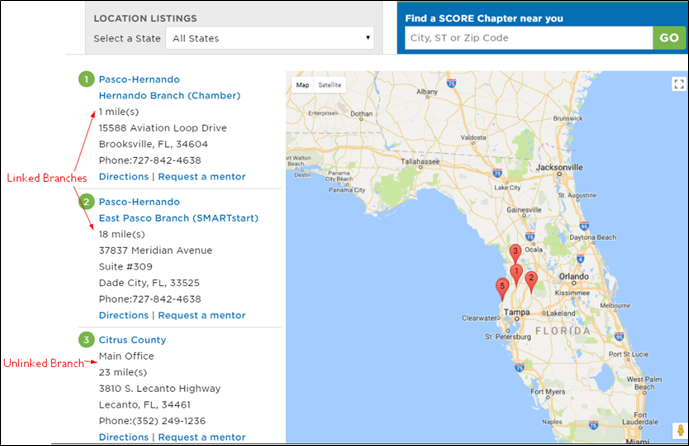
Figure 2‑19 - Branch links
While Chapters are automatically linked on the “Find a Location” page, Branches must be added manually. First, create a landing page for your branch, then follow the steps below to create the link.
To link your Branch page, find your branch node in the content list.
- Open the Branch node. Click “edit”
- Open the “Branch Info” tab
- In the “Branch Link” field, enter the link to Branch Content page you created.
- “Save”
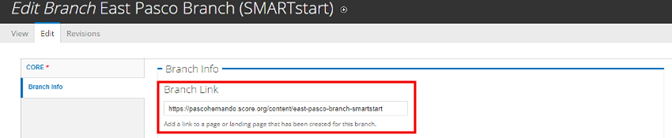
Figure 2‑20 - Branch link configuration
2.4 Adding and Editing Additional Chapter Content
Adding and Editing Content on Chapter sites is very similar to adding and editing content on the National Site. Please review the following sections:
- Adding a Node
- Author Profile
- Basic Page
- Blog Post
- Event
- Headline
- Landing Page
- Mentor Profile
- Resource
- Success Story
- Working with the WYSIWYG
- Image Cropping
- Referencing Content
- Sponsors
- Finding Content

